Updating MediaWiki: Difference between revisions
(Remove refresh instructions) |
|||
| (25 intermediate revisions by 3 users not shown) | |||
| Line 1: | Line 1: | ||
The MediaWiki project provides an official [https://www.mediawiki.org/wiki/Manual:Upgrading wiki page] which explains the procedure to update a wiki. Unfortunately, their instructions are complex, and the page contains a lot of information that is outdated or irrelevant for our users. To make it easier for our users to update, this documentation page aims to be more accessible and easier to understand. However, this page is not an authoritative source on the subject. If the instructions on this page are unclear at any point, you should always refer back to the official instructions. | The MediaWiki project provides an official [https://www.mediawiki.org/wiki/Manual:Upgrading wiki page] which explains the procedure to update a wiki. Unfortunately, their instructions are complex, and the page contains a lot of information that is outdated or irrelevant for our users. To make it easier for our users to update, this documentation page aims to be more accessible and easier to understand. However, this page is not an authoritative source on the subject. If the instructions on this page are unclear at any point, you should always refer back to the official instructions. | ||
{{info|In this guide, we assume you are familiar with the files on your ULYSSIS account. If you don't know how to access these files, please read [[Accessing your files]] first.}} | |||
If you | == Downloading the right version == | ||
To start updating MediaWiki, you will need to download the archive file of the version you want to update to. If you did not receive an email from our [[Software Version Checker]], follow the instructions in the next subsection. Otherwise, you can skip to the subsection [[#Downloading the right version using the Software Version Checker | Downloading the right version using the Software Version Checker]]. | |||
=== Downloading the right version based on your wiki === | |||
You can find your current MediaWiki version by going to the <code>Special:Version</code> page on your wiki (simply paste this in the search box) and looking for the "MediaWiki" version under "Installed software". For example, for this wiki, you can find the current version at [[Special:Version]]. At the time of writing, it looks like this: | |||
[[File:Installed software.png|center|frame]] | |||
A table of all recent MediaWiki versions can be found on [https://en.wikipedia.org/wiki/MediaWiki_version_history wikipedia]. Currently supported versions are indicated by a green or yellow color in the first column. To determine which version you want to download, follow these steps: | |||
* If the ''branch'' of your version ('''the first two numbers''', like <code>1.xx</code>) is currently supported (green or yellow), you should choose the latest version for this branch. For example, for version 1.35.3, the branch is 1.35. | |||
* If this branch is not supported anymore, you should choose the most recent LTS branch. This is indicated by '''(LTS)''' in the second column. '''Make sure this LTS branch is not older than your current branch!''' | |||
* If the most recent LTS branch is older than your current branch, you should choose the newest supported branch (green). | |||
The easiest way to | Now, click on the link of the branch you want to download. This will redirect you to a page with information about this version. The first paragraph on this page contains a link to <code>mediawiki-1.xx.yy.tar.gz</code>. Download this archive and save it somewhere on your computer. | ||
=== Downloading the right version using the Software Version Checker === | |||
The email you received will contain a link to the correct MediaWiki version. This link looks something like: | |||
https://releases.wikimedia.org/mediawiki/1.xx/mediawiki-core-1.xx.yy.tar.gz | |||
Simply click this link to download the archive and save it somewhere on your computer. | |||
== Renaming the old installation == | |||
An important step in the update process is to rename the old installation directory. This way, you can simply copy your data from the old installation directory to the new installation directory during the update. Additionally, you can easily restore your old wiki if something goes wrong. | |||
The easiest way to do this, is to '''rename''' your wiki location (the directory containing your <code>LocalSettings.php</code> configuration file) to a new directory. If you don't know how to access your files on your ULYSSIS account, refer to [[Accessing your files]] for easy instructions. For example, if <code>LocalSettings.php</code> is stored in <code>www/wiki</code>, you should '''rename''' the wiki folder to <code>wiki_old</code>. | |||
== Installing the new files == | == Installing the new files == | ||
Now, you will need to upload the <code>mediawiki- | Now, you will need to upload the <code>mediawiki-1.xx.yy.tar.gz</code> file you downloaded in step 1 next to the old installation directory. For example, if your old installation directory is located in <code>www/wiki_old</code>, upload <code>mediawiki-1.xx.yy.tar.gz</code> to <code>www/</code>. | ||
After uploading, you can extract the file on the server by using the Cyberduck "Expand Archive" feature. Simply right click the | After uploading, you can extract the archive file on the server by using the Cyberduck "Expand Archive" feature. Simply right click the archive and click "Expand Archive". | ||
[[File:Cyberduck expand.png|thumb|center]] | [[File:Cyberduck expand.png|thumb|center]] | ||
This will create a directory named <code>mediawiki- | This will create a directory named <code>mediawiki-1.xx.yy</code>. Rename this directory to the original name of your wiki directory on your ULYSSIS account. For example, if the original name was <code>wiki</code>, rename this directory from <code>mediawiki-1.xx.yy</code> to <code>wiki</code>. This can be done using Cyberduck by right clicking the directory and clicking "Rename". | ||
[[File:Cyberduck rename.png|thumb|center]] | [[File:Cyberduck rename.png|thumb|center]] | ||
Finally, you need to | Finally, you need to move certain other other files and directories from the '''old''' directory to the '''new''' directory. The easiest way to do this using Cyberduck is by going up a directory (so if your wiki is in <code>www/wiki</code>, go to <code>www</code>), and drag-and-dropping the necessary files and directories. For example, moving <code>LocalSettings.php</code> by drag-and-dropping it from <code>wiki_old</code> into <code>wiki</code>: | ||
[[File:Cyberduck wiki move 1.png|500px]] | |||
[[File:Cyberduck | [[File:Cyberduck wiki move 2.png|500px]] | ||
Although the exact files you need to | Although the exact files you need to move are different depending on your wiki, here are some suggestions from the [https://www.mediawiki.org/wiki/Manual:Upgrading#Other_files official instructions]: | ||
* <code>LocalSettings.php</code>, which contains your old configuration settings. | * <code>LocalSettings.php</code>, which contains your old configuration settings. | ||
* The directory containing the uploaded files to the wiki. | * The <code>images/</code> directory, containing the uploaded files to the wiki. Because the new wiki directory already contains an (empty) <code>images</code> directory, you need to delete that one first by right-clicking on it and pressing "Delete". Make sure to only delete the <code>images</code> directory in the '''new''' wiki directory. Then you can move the old <code>images</code> directory into the new wiki directory. | ||
* Custom extensions from within the <code>extensions/</code> directory. Be careful not to overwrite the default extensions that are bundled with the new MediaWiki version. | * Custom extensions from within the <code>extensions/</code> directory. Be careful not to overwrite the default extensions that are bundled with the new MediaWiki version. | ||
* Custom skins from within the <code>skins/</code> directory. Be careful not to overwrite the default skins that are bundled with the new MediaWiki version. | * Custom skins from within the <code>skins/</code> directory. Be careful not to overwrite the default skins that are bundled with the new MediaWiki version. | ||
* Any <code>.htaccess</code> file, if present. '''Make sure you can view hidden files'''; to enable this for Cyberduck, you can look at [[Accessing_your_files#Viewing_hidden_files|Accessing your files]]. | |||
* Any <code>.htaccess</code> file, if present. | |||
== Updating extensions == | == Updating extensions == | ||
If you use any extensions that are not bundled with MediaWiki by default, you should update them too. As the | If you use any extensions that are not bundled with MediaWiki by default, you should update them too. A list of bundled extensions can be found at https://www.mediawiki.org/wiki/Bundled_extensions_and_skins, these extensions will be updated automatically. However, for example, you might have the ULYSSIS extensions [[Securing MediaWiki using Centrale KU Leuven Login|MediaWikiShibboleth]] or [https://github.com/ULYSSIS-KUL/CompressUploads CompressUploads] installed. As with MediaWiki itself, you can find the versions of your installed extensions on the <code>Special:Version</code> page, under "Installed extensions". Extensions will often link to a website where you can download the latest versions. For example, for this wiki, you can find the installed extensions at [[Special:Version]]. At the time of writing, it looks like this: | ||
[[File:Installed extensions.png|center|frame]] | |||
Because the update instructions are different for each extension, you will have to refer to the update instructions of the extension you want to update. However, most extensions follow the same template as the MediaWiki upgrade itself: | |||
* Downloading the latest version: make sure to download the correct update for your new MediaWiki version. | * Downloading the latest version: make sure to download the correct update for your new MediaWiki version. | ||
* Making a backup of the extension: you should already have a backup in the directory you created in step 2. | * Making a backup of the extension: you should already have a backup in the directory you created in step 2. | ||
* Extracting the files: similar to the MediaWiki | * Extracting the archive files: similar to the MediaWiki tar.gz archive files, you might have to copy the new extension files to a directory in the new <code>extension/</code> directory. | ||
== Finalizing the update == | == Finalizing the update == | ||
The final step in the update process is to update the database structure of your wiki. | The final step in the update process is to update the database structure of your wiki. Your MediaWiki installation contains a script, called <code>update.php</code>, to perform the necessary database upgrades. This script can be executed using the Cyberduck "Send Command" feature. | ||
[[File:Cyberduck send command.png|thumb|center]] | [[File:Cyberduck send command.png|thumb|center]] | ||
Enter the following command in the pop-up box: | Enter the following command in the pop-up box (of course, replace <code><wiki installation location></code> with the location of your new installation): | ||
php <wiki installation location>/maintenance/update.php | php <wiki installation location>/maintenance/update.php | ||
| Line 67: | Line 79: | ||
[[File:Cyberduck update output.png|center|750px]] | [[File:Cyberduck update output.png|center|750px]] | ||
If you get the error <code>Could not open input file</code>, you might have misspelled the installation location. Double check the path to make sure everything is correct. | |||
If you encounter any other errors while executing the script, you could try taking a look at the [https://www.mediawiki.org/wiki/Manual:Upgrading#Command_line_2 official instructions]. If this does not resolve your problems, feel free to send us an email. We will try to assist you in completing the update. | |||
Congratulations! You successfully updated MediaWiki. Still, there are two more important steps you must perform: | Congratulations! You successfully updated MediaWiki. Still, there are two more important steps you must perform: | ||
* Test your new MediaWiki installation: make sure all basic functionality (viewing, editing pages, file upload) works and all your extensions function properly. | * Test your new MediaWiki installation: make sure all basic functionality (viewing, editing pages, file upload) works and all your extensions function properly. | ||
* Delete the | * Delete the old installation: you should remove the previously created <code>www/wiki_old</code> directory, using the command line or through a GUI. A simple GUI explanation can be found on [[Accessing_your_files#Creating_and_Deleting_files_and_folders|Accessing your files]]. | ||
== If something goes wrong == | |||
If something goes wrong during the update so your wiki doesn't work anymore, you can revert the process to go back to your old wiki. If you already moved files or directories such as <code>LocalSettings.php</code> or <code>images</code> from <code>wiki_old</code> to <code>wiki</code>, move them back into <code>wiki_old</code>. Then delete <code>wiki</code> and rename <code>wiki_old</code> back to <code>wiki</code>. Your old wiki is then restored so you can retry the update process. If you still run into any trouble, feel free to email us at [mailto:ulyssis@ulyssis.org ulyssis@ulyssis.org]. | |||
Latest revision as of 22:09, 7 September 2021
The MediaWiki project provides an official wiki page which explains the procedure to update a wiki. Unfortunately, their instructions are complex, and the page contains a lot of information that is outdated or irrelevant for our users. To make it easier for our users to update, this documentation page aims to be more accessible and easier to understand. However, this page is not an authoritative source on the subject. If the instructions on this page are unclear at any point, you should always refer back to the official instructions.
In this guide, we assume you are familiar with the files on your ULYSSIS account. If you don't know how to access these files, please read Accessing your files first.
Downloading the right version
To start updating MediaWiki, you will need to download the archive file of the version you want to update to. If you did not receive an email from our Software Version Checker, follow the instructions in the next subsection. Otherwise, you can skip to the subsection Downloading the right version using the Software Version Checker.
Downloading the right version based on your wiki
You can find your current MediaWiki version by going to the Special:Version page on your wiki (simply paste this in the search box) and looking for the "MediaWiki" version under "Installed software". For example, for this wiki, you can find the current version at Special:Version. At the time of writing, it looks like this:
A table of all recent MediaWiki versions can be found on wikipedia. Currently supported versions are indicated by a green or yellow color in the first column. To determine which version you want to download, follow these steps:
- If the branch of your version (the first two numbers, like
1.xx) is currently supported (green or yellow), you should choose the latest version for this branch. For example, for version 1.35.3, the branch is 1.35. - If this branch is not supported anymore, you should choose the most recent LTS branch. This is indicated by (LTS) in the second column. Make sure this LTS branch is not older than your current branch!
- If the most recent LTS branch is older than your current branch, you should choose the newest supported branch (green).
Now, click on the link of the branch you want to download. This will redirect you to a page with information about this version. The first paragraph on this page contains a link to mediawiki-1.xx.yy.tar.gz. Download this archive and save it somewhere on your computer.
Downloading the right version using the Software Version Checker
The email you received will contain a link to the correct MediaWiki version. This link looks something like:
https://releases.wikimedia.org/mediawiki/1.xx/mediawiki-core-1.xx.yy.tar.gz
Simply click this link to download the archive and save it somewhere on your computer.
Renaming the old installation
An important step in the update process is to rename the old installation directory. This way, you can simply copy your data from the old installation directory to the new installation directory during the update. Additionally, you can easily restore your old wiki if something goes wrong.
The easiest way to do this, is to rename your wiki location (the directory containing your LocalSettings.php configuration file) to a new directory. If you don't know how to access your files on your ULYSSIS account, refer to Accessing your files for easy instructions. For example, if LocalSettings.php is stored in www/wiki, you should rename the wiki folder to wiki_old.
Installing the new files
Now, you will need to upload the mediawiki-1.xx.yy.tar.gz file you downloaded in step 1 next to the old installation directory. For example, if your old installation directory is located in www/wiki_old, upload mediawiki-1.xx.yy.tar.gz to www/.
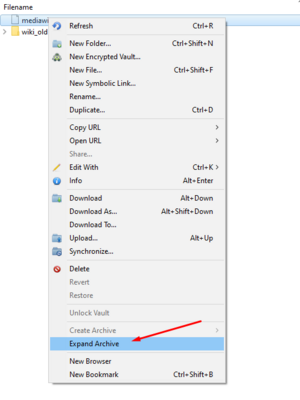
After uploading, you can extract the archive file on the server by using the Cyberduck "Expand Archive" feature. Simply right click the archive and click "Expand Archive".
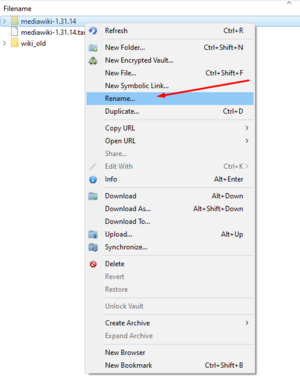
This will create a directory named mediawiki-1.xx.yy. Rename this directory to the original name of your wiki directory on your ULYSSIS account. For example, if the original name was wiki, rename this directory from mediawiki-1.xx.yy to wiki. This can be done using Cyberduck by right clicking the directory and clicking "Rename".
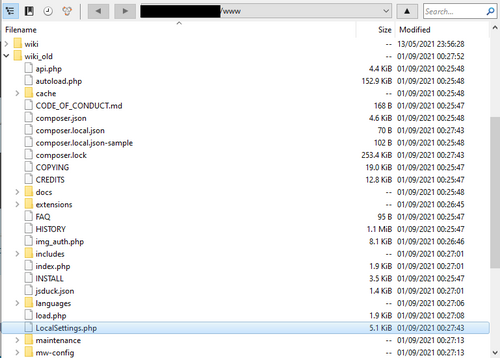
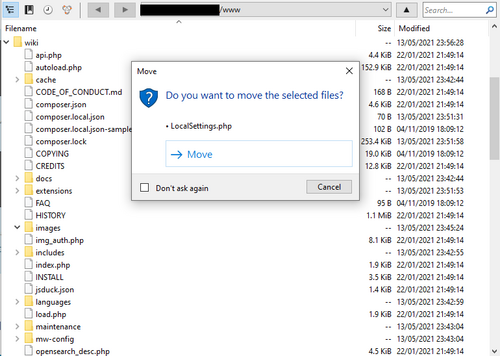
Finally, you need to move certain other other files and directories from the old directory to the new directory. The easiest way to do this using Cyberduck is by going up a directory (so if your wiki is in www/wiki, go to www), and drag-and-dropping the necessary files and directories. For example, moving LocalSettings.php by drag-and-dropping it from wiki_old into wiki:
Although the exact files you need to move are different depending on your wiki, here are some suggestions from the official instructions:
LocalSettings.php, which contains your old configuration settings.- The
images/directory, containing the uploaded files to the wiki. Because the new wiki directory already contains an (empty)imagesdirectory, you need to delete that one first by right-clicking on it and pressing "Delete". Make sure to only delete theimagesdirectory in the new wiki directory. Then you can move the oldimagesdirectory into the new wiki directory. - Custom extensions from within the
extensions/directory. Be careful not to overwrite the default extensions that are bundled with the new MediaWiki version. - Custom skins from within the
skins/directory. Be careful not to overwrite the default skins that are bundled with the new MediaWiki version. - Any
.htaccessfile, if present. Make sure you can view hidden files; to enable this for Cyberduck, you can look at Accessing your files.
Updating extensions
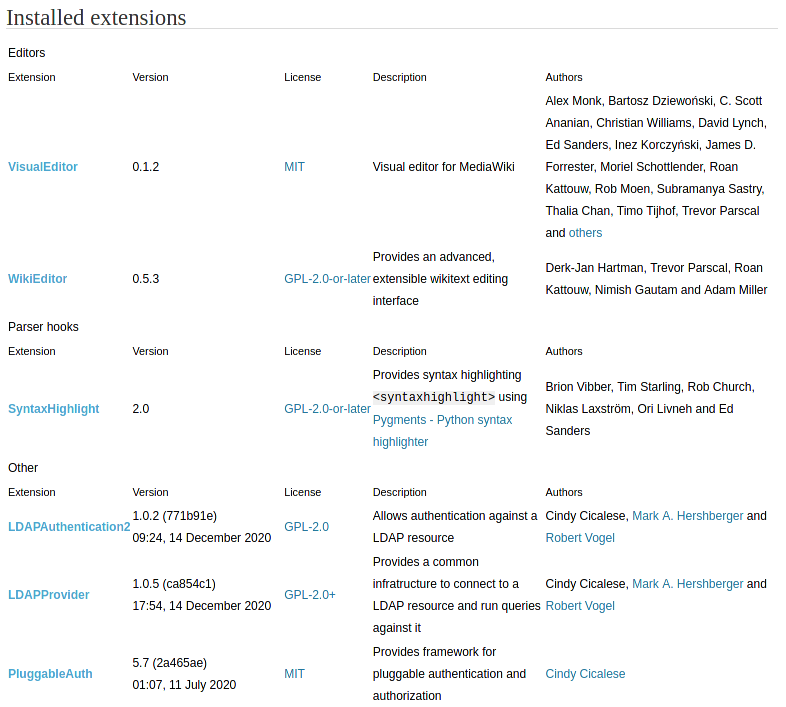
If you use any extensions that are not bundled with MediaWiki by default, you should update them too. A list of bundled extensions can be found at https://www.mediawiki.org/wiki/Bundled_extensions_and_skins, these extensions will be updated automatically. However, for example, you might have the ULYSSIS extensions MediaWikiShibboleth or CompressUploads installed. As with MediaWiki itself, you can find the versions of your installed extensions on the Special:Version page, under "Installed extensions". Extensions will often link to a website where you can download the latest versions. For example, for this wiki, you can find the installed extensions at Special:Version. At the time of writing, it looks like this:
Because the update instructions are different for each extension, you will have to refer to the update instructions of the extension you want to update. However, most extensions follow the same template as the MediaWiki upgrade itself:
- Downloading the latest version: make sure to download the correct update for your new MediaWiki version.
- Making a backup of the extension: you should already have a backup in the directory you created in step 2.
- Extracting the archive files: similar to the MediaWiki tar.gz archive files, you might have to copy the new extension files to a directory in the new
extension/directory.
Finalizing the update
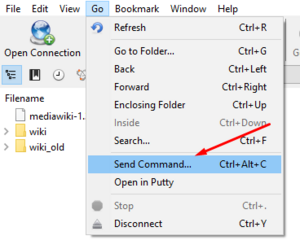
The final step in the update process is to update the database structure of your wiki. Your MediaWiki installation contains a script, called update.php, to perform the necessary database upgrades. This script can be executed using the Cyberduck "Send Command" feature.
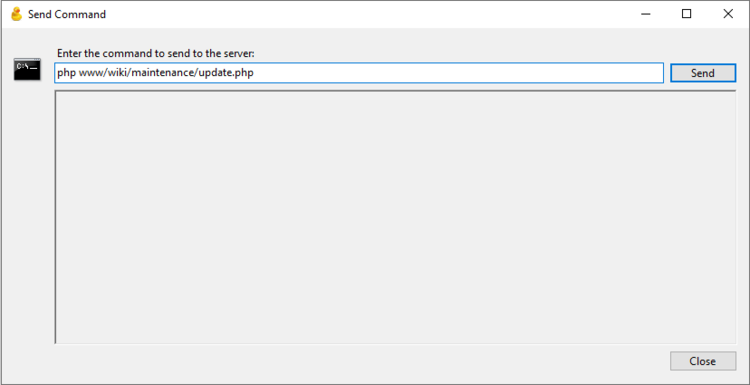
Enter the following command in the pop-up box (of course, replace <wiki installation location> with the location of your new installation):
php <wiki installation location>/maintenance/update.php
For example, if your wiki is located at www/wiki, the command should be as follows:
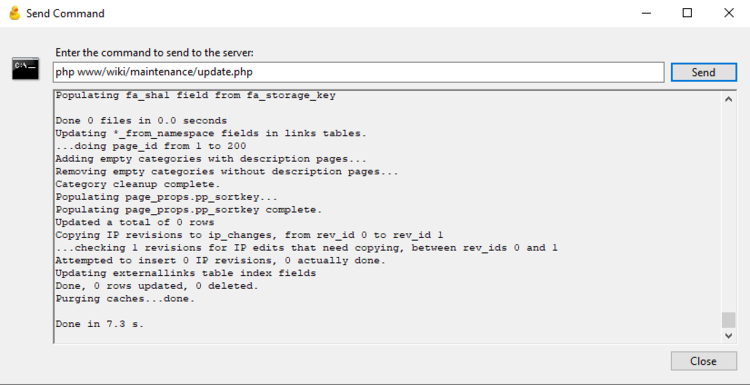
After pressing "Send", the command will be executed on the server. If everything went well, you should see a lot of output, ending with something like:
If you get the error Could not open input file, you might have misspelled the installation location. Double check the path to make sure everything is correct.
If you encounter any other errors while executing the script, you could try taking a look at the official instructions. If this does not resolve your problems, feel free to send us an email. We will try to assist you in completing the update.
Congratulations! You successfully updated MediaWiki. Still, there are two more important steps you must perform:
- Test your new MediaWiki installation: make sure all basic functionality (viewing, editing pages, file upload) works and all your extensions function properly.
- Delete the old installation: you should remove the previously created
www/wiki_olddirectory, using the command line or through a GUI. A simple GUI explanation can be found on Accessing your files.
If something goes wrong
If something goes wrong during the update so your wiki doesn't work anymore, you can revert the process to go back to your old wiki. If you already moved files or directories such as LocalSettings.php or images from wiki_old to wiki, move them back into wiki_old. Then delete wiki and rename wiki_old back to wiki. Your old wiki is then restored so you can retry the update process. If you still run into any trouble, feel free to email us at ulyssis@ulyssis.org.

