Accessing your files: Difference between revisions
(→Mac) |
mNo edit summary |
||
| (19 intermediate revisions by 5 users not shown) | |||
| Line 1: | Line 1: | ||
This documentation article will explain how to upload, download, move and delete files on your account using a graphical user interface. If you are a more advanced user, you may want to use the command line to administer your files, in that case [[Accessing shell servers over SSH]] is probably a more relevant documentation page for you. | |||
Many different SFTP clients are available depending on your needs and what operating system you run on your computer. For Windows and Mac users, we recommend the graphical SFTP client [https://cyberduck.io/download/ Cyberduck]. If you're using Linux, your file manager usually has a built-in option to connect using the details mentioned in [[#Connecting | Connecting]]. | |||
== | ==Connecting== | ||
{{notice|Keep in mind|Our automatic security systems may temporarily prevent you from connecting over SSH/SFTP if you try to connect several times with the wrong username and/or password. This will result in the connection being refused. You can switch between sftp://ssh1.ulyssis.org and sftp://ssh2.ulyssis.org when this happens or wait 10 minutes. More information on our security measures is available on [[ULYSSIS security measures]]}} | |||
A Cyberduck-specific explanation can be found at [[#Connecting_2 | Cyberduck: Connecting]]. To access your files using another program you will have to enter the following connection details: | |||
* Protocol: SFTP | |||
* Server: "ssh1.ulyssis.org" or "ssh2.ulyssis.org" | |||
* Port: 22 | |||
* Username: your ULYSSIS account username, the one you use for [https://ucc.ulyssis.org ucc.ulyssis.org] | |||
* Password: your ULYSSIS account password | |||
On our servers, your files are stored in your home folder located at <code>/home/(group)/(username)/</code>, where the group depends upon your account type and the username is your ULYSSIS account username. Any regular user is stored within the <code>user</code> group, and their files are stored within <code>/home/user/(username)</code>. For organizations, <code>org</code> is used, so files are stored within <code>/home/org/(username)</code>. Most (S)FTP clients will by default display your own home folder after you've logged in. | |||
==Using Cyberduck== | |||
To get started, download [https://cyberduck.io/download/ Cyberduck] from the official website. You can then install the downloaded file like you would install any other application. Once installed, launch Cyberduck and connect using the steps below. | |||
=== Connecting === | |||
=== | |||
<ul> | <ul> | ||
<li> | <li>Click on Open Connection in the top-left corner.</li> | ||
<li> | <li>Protocol (upper dropdown menu): "SFTP (SSH File Transfer Protocol)"</li> | ||
<li> | <li>Username: your ULYSSIS account username, the one you use for [https://ucc.ulyssis.org ucc.ulyssis.org]</li> | ||
<li> | <li>Password: your ULYSSIS account password</li> | ||
<li> | <li>Server: "ssh1.ulyssis.org" or "ssh2.ulyssis.org" | ||
</ul> | <li>Enable "Save Password" if you don't want to enter your password every time you want to connect using this computer</li> | ||
[[File: | <li>Press connect</li> | ||
</ul>[[File:Open-connection-WB.png|alt=|left|frame]] | |||
If you get a dialog window about an unknown fingerprint, tick the "Always" box in the bottom left and then click allow. You will now be connected and able to access your files. | |||
[[File:Fingerprint dialog window.png|none|alt=|frame]] | |||
[[File: | |||
When you connect to a server using Cyberduck, the remote files will appear: | |||
[[File:Cyberduck connection interface.png|none|alt=|frame]] | |||
===Navigating=== | |||
You can open a folder by double-clicking it. To go back up one step you can press the "Up" button to the right of the "Current Folder" dropdown. | |||
To go back up multiple steps you can click on the "Current Folder" dropdown and select which folder you would like to go back to.[[File:Navigating-WB.png|none|alt=|frame]] | |||
===Viewing hidden files=== | |||
To make hidden files, whose filename always start with a '.', visible, click on View -> Show Hidden Files. This is necessary because some files like ".htaccess" and ".user.ini" are hidden by default and they need to be edited sometimes. | |||
[[File:Hidden Files.png|none|thumb]] | |||
[[File: | ===Uploading files and folders=== | ||
To upload a file or folder, you can use the "Upload" button in the top menu bar and select the file or folder you wish to upload using your file manager. | |||
[[File:Cyberduck-upload-button.png|alt=|frame|left]] | |||
Or you can drag and drop it from your file manager (Explorer for Windows, Finder for Mac) into the current folder in Cyberduck. | |||
[[File:Upload-drag-WB.png|none|alt=|thumb|514x514px]] | |||
===Downloading files and folders=== | |||
To download files and folders, you can drag and drop it into your file manager (Explorer for Windows or Finder for Mac), just like uploading but in the other direction. For files specifically it's also possible to simply double-click the file. This will then download it to your Downloads folder. | |||
===Creating and Deleting files and folders=== | |||
To create a folder, you right click where you want your folder to be located and then click the "New Folder" option as seen below. You can then type a name for your new folder. | |||
To create a file, you right click in the folder where you want your file to be located and then click the "New File" option as seen below. You can then type a name for your new file, making sure to include the necessary extension (e.g. file.txt for a text file, file.php for a PHP file, etc.). | |||
You can | You can delete a file or folder by selecting it and then either pressing the "Delete" key on your keyboard, or right-clicking and selecting "Delete". | ||
[[File:Delete-cyberduck-WB.png|alt=|thumb|384x384px|none]] | |||
===Editing files=== | |||
Cyberduck allows you to edit files remotely by selecting a file and then pressing the "Edit" button in the top menu bar, next to the "Upload" button. This opens the file in your text editor (by default Notepad for Windows and TextEdit for Mac). After you're done editing, make sure to save the file using the text editor and then close it. | |||
[[File:Edit.png|none|alt=|frame]] | |||
[[Category:Files]] | |||
[[Category:Shell]] | |||
Latest revision as of 10:57, 9 August 2021
This documentation article will explain how to upload, download, move and delete files on your account using a graphical user interface. If you are a more advanced user, you may want to use the command line to administer your files, in that case Accessing shell servers over SSH is probably a more relevant documentation page for you.
Many different SFTP clients are available depending on your needs and what operating system you run on your computer. For Windows and Mac users, we recommend the graphical SFTP client Cyberduck. If you're using Linux, your file manager usually has a built-in option to connect using the details mentioned in Connecting.
Connecting
![]() Keep in mind
Keep in mind
Our automatic security systems may temporarily prevent you from connecting over SSH/SFTP if you try to connect several times with the wrong username and/or password. This will result in the connection being refused. You can switch between sftp://ssh1.ulyssis.org and sftp://ssh2.ulyssis.org when this happens or wait 10 minutes. More information on our security measures is available on ULYSSIS security measures
A Cyberduck-specific explanation can be found at Cyberduck: Connecting. To access your files using another program you will have to enter the following connection details:
- Protocol: SFTP
- Server: "ssh1.ulyssis.org" or "ssh2.ulyssis.org"
- Port: 22
- Username: your ULYSSIS account username, the one you use for ucc.ulyssis.org
- Password: your ULYSSIS account password
On our servers, your files are stored in your home folder located at /home/(group)/(username)/, where the group depends upon your account type and the username is your ULYSSIS account username. Any regular user is stored within the user group, and their files are stored within /home/user/(username). For organizations, org is used, so files are stored within /home/org/(username). Most (S)FTP clients will by default display your own home folder after you've logged in.
Using Cyberduck
To get started, download Cyberduck from the official website. You can then install the downloaded file like you would install any other application. Once installed, launch Cyberduck and connect using the steps below.
Connecting
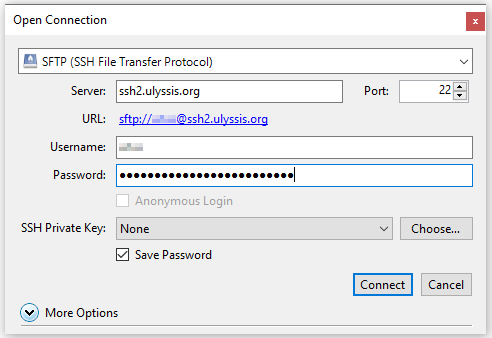
- Click on Open Connection in the top-left corner.
- Protocol (upper dropdown menu): "SFTP (SSH File Transfer Protocol)"
- Username: your ULYSSIS account username, the one you use for ucc.ulyssis.org
- Password: your ULYSSIS account password
- Server: "ssh1.ulyssis.org" or "ssh2.ulyssis.org"
- Enable "Save Password" if you don't want to enter your password every time you want to connect using this computer
- Press connect
If you get a dialog window about an unknown fingerprint, tick the "Always" box in the bottom left and then click allow. You will now be connected and able to access your files.
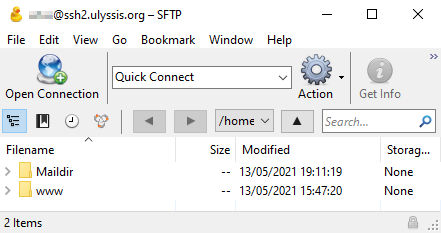
When you connect to a server using Cyberduck, the remote files will appear:
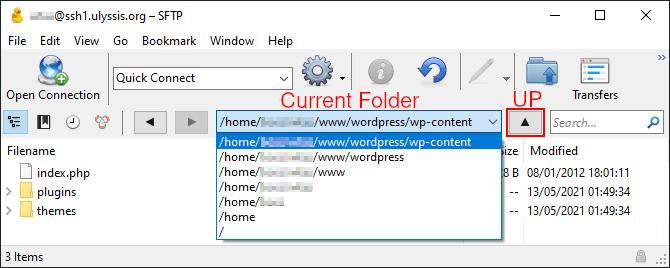
You can open a folder by double-clicking it. To go back up one step you can press the "Up" button to the right of the "Current Folder" dropdown.
To go back up multiple steps you can click on the "Current Folder" dropdown and select which folder you would like to go back to.
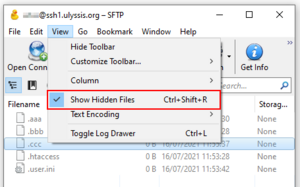
To make hidden files, whose filename always start with a '.', visible, click on View -> Show Hidden Files. This is necessary because some files like ".htaccess" and ".user.ini" are hidden by default and they need to be edited sometimes.
Uploading files and folders
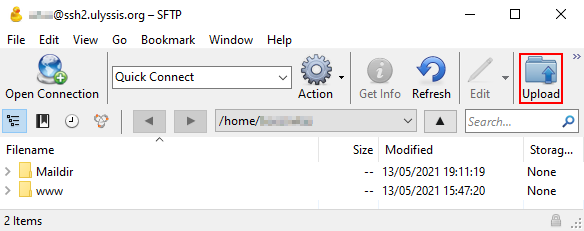
To upload a file or folder, you can use the "Upload" button in the top menu bar and select the file or folder you wish to upload using your file manager.
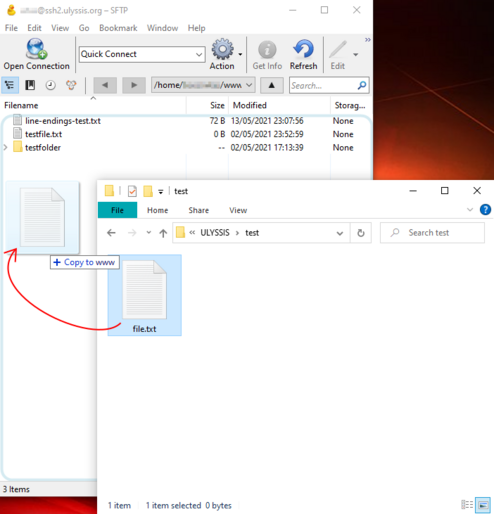
Or you can drag and drop it from your file manager (Explorer for Windows, Finder for Mac) into the current folder in Cyberduck.
Downloading files and folders
To download files and folders, you can drag and drop it into your file manager (Explorer for Windows or Finder for Mac), just like uploading but in the other direction. For files specifically it's also possible to simply double-click the file. This will then download it to your Downloads folder.
Creating and Deleting files and folders
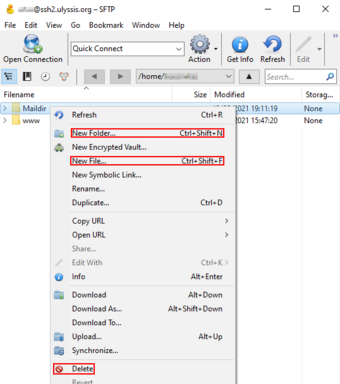
To create a folder, you right click where you want your folder to be located and then click the "New Folder" option as seen below. You can then type a name for your new folder.
To create a file, you right click in the folder where you want your file to be located and then click the "New File" option as seen below. You can then type a name for your new file, making sure to include the necessary extension (e.g. file.txt for a text file, file.php for a PHP file, etc.).
You can delete a file or folder by selecting it and then either pressing the "Delete" key on your keyboard, or right-clicking and selecting "Delete".
Editing files
Cyberduck allows you to edit files remotely by selecting a file and then pressing the "Edit" button in the top menu bar, next to the "Upload" button. This opens the file in your text editor (by default Notepad for Windows and TextEdit for Mac). After you're done editing, make sure to save the file using the text editor and then close it.
