Exporting your KU Leuven class schedule and calendar: Difference between revisions
No edit summary |
No edit summary |
||
| Line 6: | Line 6: | ||
Now you will get an overview of 3 buttons (configure series, configure agenda, reload schedule). Here you will need to select '''configure agenda''', to start configuring the settings of your KU Leuven calendar. | Now you will get an overview of 3 buttons (configure series, configure agenda, reload schedule). Here you will need to select '''configure agenda''', to start configuring the settings of your KU Leuven calendar. | ||
[[File:Agendasettings4.png|thumb| | [[File:Agendasettings4.png|thumb|430x430px]] | ||
This should give you a page with multiple options. The only setting we will need to change here, is the switch for '''Show schedule in my agenda'''. This should be switched to '''On'''. The rest of the settings can be changed to your personal liking, but are not necessary to be edited for synchronizing your agenda so they will not be discussed further here. If you adjusted the setting correctly it would look something like the screenshot on the right. | This should give you a page with multiple options. The only setting we will need to change here, is the switch for '''Show schedule in my agenda'''. This should be switched to '''On'''. The rest of the settings can be changed to your personal liking, but are not necessary to be edited for synchronizing your agenda so they will not be discussed further here. If you adjusted the setting correctly it would look something like the screenshot on the right. | ||
Revision as of 20:20, 2 August 2021
This guide will explain how your KU Leuven calendar, which you can see on Toledo, can be made more accessible even outside of Toledo. The procedure can be done by synchronizing the KU Leuven calendar with your personal agenda (e.g. Google Calendar, Thunderbird, Outlook, Windows Calendar, etc.), following the steps below.
Synchronizing your KU Leuven calendar
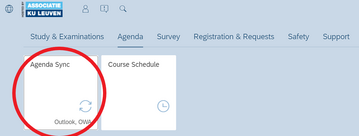
Your first step will be to visit KU Loket via Toledo or by visiting kuloket.be . Using the tabs on top of this page, go to Agenda and select Agenda Sync below, as shown in the picture.
Now you will get an overview of 3 buttons (configure series, configure agenda, reload schedule). Here you will need to select configure agenda, to start configuring the settings of your KU Leuven calendar.
This should give you a page with multiple options. The only setting we will need to change here, is the switch for Show schedule in my agenda. This should be switched to On. The rest of the settings can be changed to your personal liking, but are not necessary to be edited for synchronizing your agenda so they will not be discussed further here. If you adjusted the setting correctly it would look something like the screenshot on the right.
Now before continuing to the next few steps, we will need to wait about 15 minutes, to make sure KU Loket saved all the settings correctly.
The following step will be to visit your personal student email. This can be done again via Toledo or by visiting owa.student.kuleuven.be .This should bring you to your personal mailbox. In the top right corner of the page, you should see 3 tabs (Mail, Calendar, People). Here you will need to select Calendar, which should bring you to a page with an overview of the KU Leuven calendar (future tasks and courses that are put on Toledo by your professors, should also be shown here now).
If the calendar is still completely empty, check if your agenda settings in KU Loket are set correctly according to the screenshot and that you are looking at time period where classes are scheduled and not a holiday period.
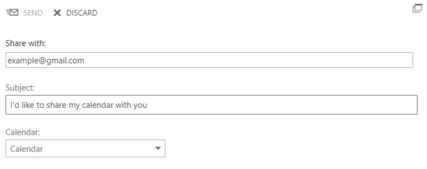
Continuing in the top right corner of the page, below the menu bar, there should be 2 buttons (share, print), as shown in the screenshot. You will need to select the share button. This will open a side-panel with 3 different fields.
- Share with: Here you need to enter a personal (non-KU Leuven) email address. When you have filled in the address, make sure 'full details' is selected from the dropdown menu (this should be done by default).
- Subject: This is the message you will send to the address you entered above, but the content of the message does not really matter. You can leave it as it is.
- Calendar: This defines that you will share your calendar. You can leave it as it is.
If you filled in the information correctly, made sure the chosen email address is right, and compared the information to the screenshot on the right, you can press Send.
Now you will need to check the mailbox of the email address you entered before. Normally you should have received an email with two weblinks. The first link (ending on .html) shows your calendar in your webbrowser, the second link (ending on .ics) is your iCal feed. In this case we will need the second link.
Importing the iCal link to your chosen personal agenda can vary widely depending on which personal agenda you are using. We list a few links here on how to import iCal into the agenda for the most common services:
- Google Calendar: https://support.google.com/calendar/answer/37648?hl=en
- Outlook Calendar: https://www.howtogeek.com/661142/how-to-add-an-icalendar-link-to-your-outlook-calendar/
- Thunderbird: https://support.mozilla.org/en-US/questions/1105153
Almost all calendar services support importing iCal. If your chosen calendar service is not listed here, you can try searching the internet on how to import iCal for your service.


