Accessing your files: Difference between revisions
(→Linux) |
(→Linux) |
||
| Line 17: | Line 17: | ||
This will open up a file browser connected to the remote server. Here, you can create new files, delete files, upload files (by copying or dragging them in the file browser), download files (by copying or dragging them from the file browser), change file rights etc. | This will open up a file browser connected to the remote server. Here, you can create new files, delete files, upload files (by copying or dragging them in the file browser), download files (by copying or dragging them from the file browser), change file rights etc. | ||
[[File:UbuntuConnectToServer.png | [[File:UbuntuConnectToServer.png]] | ||
===Windows=== | ===Windows=== | ||
Revision as of 10:24, 16 April 2016
Next to running commands, you can also use the shell servers to access your files. There are several methods to do this, some graphical, some not. The former definitely are the easiest option to go for.
On the server, your files are located in /home/group/username/. For a normal user with username username/ this will be /home/user/username/, for an organisation with username organisation/ this will be /home/org/organisation/ etc.
Graphical methods
Linux
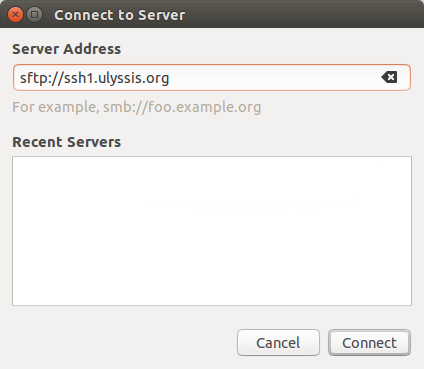
Linux normally gives you the option to connect to a server graphically. On Ubuntu, in "Files", choose "Connect to server." using the following options:
- Server Address: sftp://ssh1.ulyssis.org or sftp://ssh2.ulyssis.org
If you are connecting for the first time, you will need to accept the identity of the server. Enter your username and password and connect, if necessary, unlock your keyring by entering your computer's password.
This will open up a file browser connected to the remote server. Here, you can create new files, delete files, upload files (by copying or dragging them in the file browser), download files (by copying or dragging them from the file browser), change file rights etc.
Windows
Windows doesn't support native remote file browsers, so you will have to download a program first. A good option is FileZilla, which is completely free. Download it, install it and run it.
Using the quickconnect bar
- Host: sftp://ssh1.ulyssis.org or sftp://ssh2.ulyssis.org
- Username: your username
- Password: your password
- Port: 22 (you can leave this blank)
- Connect to ULYSSIS by clicking on Quickconnect
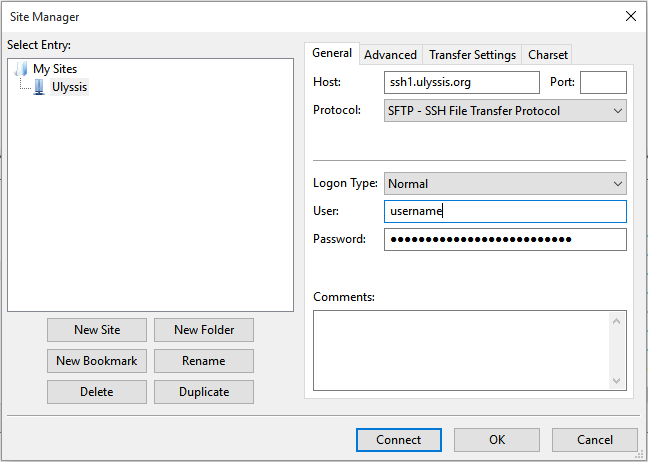
Using the site manager
- Go to Files, Site Manager...
- Add a new site
- Host: ssh1.ulyssis.org or ssh2.ulyssis.org
- Port: 22 (you can leave this blank)
- Protocol (dropdown menu): SFTP - SSH File Transfer Protocol
- Logon Type (dropdown menu): Normal
- User: your username
- Password: your password
Mac
Download the free and open source program Cyberduck
Follow the installations instructions and afterwards open Cyberduck in your Applications folder. Click on 'Open Connection' in the left top corner.
- Dropdown menu: SFTP (SSH File Transfer Protocol)
- Server: ssh1.ulyssis.org or ssh2.ulyssis.org
- Port: you can leave the default value
- Username: your username
- Password: your password
Click on 'Connect' and you're done. By dragging and dropping you can manipulate files from and to your Mac.
Non-graphical methods
You can also use a terminal (on Linux) or Putty (on Windows) to access your files. Connect to the server as described above, and use commands as cd, ls, mkdir, rm, nano or chmod to manage your files.
You can also use scp (secure copy) to copy files from and to the servers (don't use ssh first). For example, to copy a file called file.txt to your home dir on the server, use (with username your username and /home/user/username your home dir as described above):
scp file.txt username@ssh1.ulyssis.org:/home/user/username
For other examples and more info, see http://www.hypexr.org/linux_scp_help.php.


