Setting up WordPress
How to install Wordpress for your account
First you will have to download Wordpress from their website, https://wordpress.org/download/. You now receive a compressed file (.tar.gz or .zip) that you need to extract, it will give you a directory named 'wordpress'.
Next, you have to move the contents of the 'wordpress' directory to your 'www' directory on our server, which can be accessed via SFTP. If you would have any more questions about this, you can always follow our other guide here: https://docs.ulyssis.org/Accessing_your_files.
After you moved the contents of the 'wordpress' folder in the 'www' directory, you need to go to your account
on *your username here*.ulyssis.be. This is where you have to setup your website. The easiest way to do this, is by following the wizard.
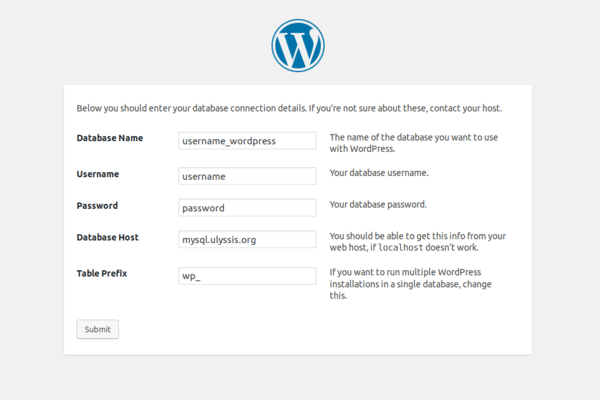
Continue until the wizard asks you for your database configuration:
- Database Name/Databasenaam: If you haven't created a MySQL database/user on UCC, then you'll have to create one by following our guide here: https://docs.ulyssis.org/Using_MySQL. And choose what database you want to use for your wordpress site.
- Username/Gebruikersnaam: The name you used during the creation of your database account.
- Password/Wachtwoord: The password you used during the creation of your database account.
- Database Host/Hostnaam: This is has to be:
mysql.ulyssis.org - Table Prefix: You do not have to change this field.
So it will look something like this:
Afterwards, you can proceed the wizard.
At a certain point, you receive a notification to log in on wordpress. This means you have succesfully installed your own wordpress site.
Setting up multiple instances of Wordpress
If you want to have multiple instances of a Wordpress site, you need to create a new folder in your 'www' directory on your shell account. Then you need a virtual host for this folder, herefor you have to send us an email asking for this.
After your new virtual host has been configured, you need to do the same steps that you would do for a regular Wordpress installation, i.e. the steps in the section above.
You can also use Wordpress' multisite option. If you need more help with this, you can find it here: here.
